Getting Started with Reports
Reports
Teamable's Reporting is powered by Looker (part of Google Cloud).
Each Report is a considered a Dashboard comprised of several individual graphs/tables called Looks.

Standard Reports
The Standard reports are available to all users on any plan.
- Activity Report - Tracking sourcing activity and high level job performance across your team or filtered individually.
- Diversity Report - A high level look at your team's DE&I recruiting data and outreach over time.
- Candidate Targeting Report - Explore which candidates are most responsive to refine your outreach strategy.
- Campaign Statistics Report - Look at your team's campaigns in depth to see what messaging performs best.
- Benchmarks Report - Industry benchmarking and a look at your team's performance in comparison.
- ATS Report - Visualize your entire ATS candidate pipeline with stage breakdowns and time to hire.
Advanced Reports
The Advanced reports are available to all users on any plan.
After completing a new report via the 'Explore option' it will save to the 'Custom' section below the 'Standard' reports. You can learn more about Advanced reporting here.
Leaderboard Report
The Leaderboard reporting is available to users on the Premium plan with Referrals enabled.
You can learn more about Leaderboard reporting here.
Getting Started with a Dashboard
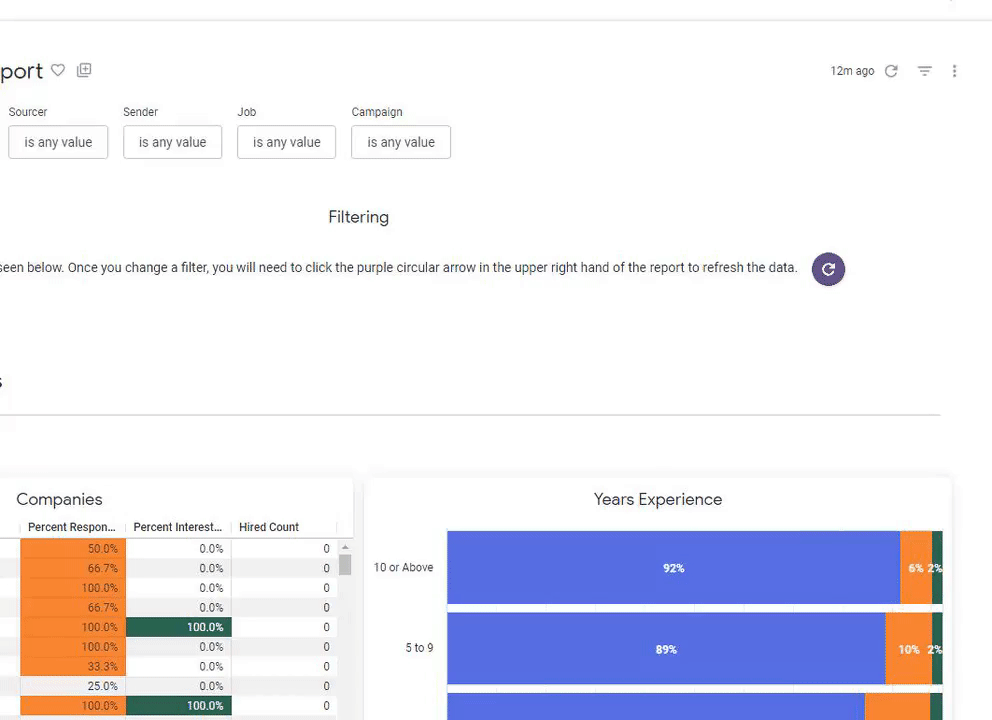
You can start getting familiar with each Dashboard by viewing the available filters on the top of the page. As an example the Activity filters are shown here.
Activity
Available Filters
You can customize your report by utilizing the filters on the top of the page. Do not forget to select the "Reload/Update" button every time you decide to make changes in the filter options.


- Timeframe - You can filter on a variety of date options, such as a specific date range and/or a time period.
- Please note that for the option "is in the range", the "until before" date does not include the date itself.
In this example, the range is September 1, 2022 to September 29, 2022 as September 30, 2022 is excluded. If you want to include September 30, 2022. You will need to set the date to October 1, 2022.

- Candidate Role Types - You can filter on role types include Engineering, Leadership, Sales, Product, Recruiting and more.
- Sender - You can filter on the outreach Sender.

View the number of candidates your team has sourced in the last 60 days.
You can select the options in the key/legend section to hide specific results.
In this example, individual teammate's Sourced counts are hidden.

Scheduling and Setting up Email Alerts for Reports
You can schedule and generate reports to send directly to your email address.
Scheduling a Dashboard Report Email
Step 1. On the Dashboard, select the ellipses (three dots) icon on the top-right hand corner of the screen.
Step 2. Select the Schedule Delivery option.
Step 3. On the Schedule Delivery menu, input the following information:
- Schedule Name: Name your scheduled alert
- Reoccurrence: Select how often you want to receive a report. Options vary from daily, weekly, monthly, and more.
- Time: Select the time of the day you want to receive the report.
- Destination: Email is the only available option
- Format: You have the option between a PDF, a CSV file or a PNG image.
Step 4. Select the Filters tab on the menu and choose the preferred filters for the scheduled report.

Step 5. Select the Advanced options tab for additional options such as a Custom Message, adding links to the report and choosing the size of the report.

Step 6. Select the "Save" button at the bottom of the menu when you are ready to confirm the delivery report schedule.
Scheduling a Look Report Email
Step 1. Go to the Look and hover of the top-right hand corner of the Look.
Step 2. Select the bell with the + sign icon.


Step 3. On the pop-up menu, select the following options:
- Condition: Select an option that triggers the email. In this example, you can select from the Total Count of Candidates, the Reached candidates, the Responded candidates or Interested candidates.

- Where to send it: The only available option is Email.
- Frequency: Select how often you want to receive a report. Options vary from daily, weekly, monthly, and more.
- Time: Select the time of the day you want to receive the report,
Step 4. Select the "Save Alert" button at the bottom of the menu when you are ready to confirm the alert.